Words cannot even express how excited I am to share this with you all!
This bed is for my sister in law and it is by far the best thing I have built so far. I LOVE it, she loves it, and apparently everyone she lets into her room loves it. I am starting to think I need to make some business cards up!
I saw this picture

somewhere a while ago. It originated from Stephanie Lynn and I fell in LOVE! I loved the simplicity and the gorgeous wood tones of the redwood. Did you know shims are made out of redwood? So pretty.
When my sister in law and I began talks of what she wanted for a bed I knew we were in for the long haul. She is the kind of person that knows exactly what she wants and takes her time deciding if she doesn't. I will never again make the mistake of going shopping with her. She is the kind of person that looks through every aisle and every clothes rack of a store to find the perfect thing. This was somewhat similar. To be fair, everything she does and wears is picture perfect. I decided to show her this picture just in case and she loved it. And born was the design of this super amazing, super three dimensional bed:

I built a super sturdy frame for the box springs out of 2x4's

I then used lag bolts to attach it to the sturdy 4x4 legs of the foot board and head board

I cut spacers for the amount of space I wanted under the bed so that everything could rest on it without trying to have 5 people hold up the bed.
I then screwed through the 2x4's from the inside to attach the sideboards.

The spacers then went in the middle just as an extra support for this king size bed.


She chose a color darker than my personal taste would be just because I would love to see more of the natural grain, but she is amazing at putting a room together and it came out perfect and she is happy with it which is all that matters.


These are 1x12 sides which almost completely cover the box spring.


Here is a good pic at how amazing the angled shims give effect and character to this headboard.
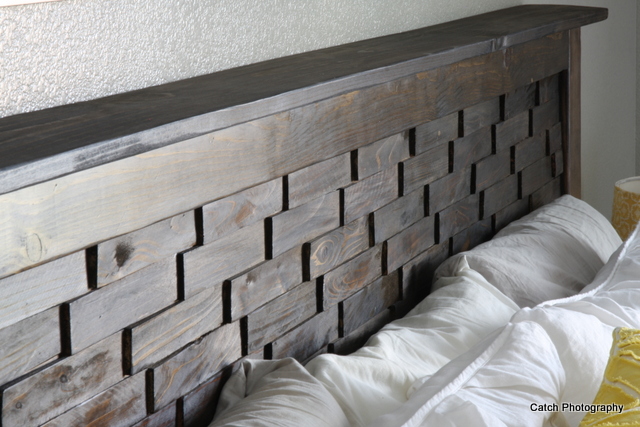
The headboard did take a while to construct. Remember that these are little individual pieces that must be aligned, cut, glued, nailed, filled, sanded and stained. I would say putting together the headboard alone took about 4 hours.


You can head on over the Ana White's site if you would like to build your own Wood Shim Bed or have some extra details!

21 comments:
Fantastic!
Becky, this is gorgeous! And your pictures look like they're straight out of a catalog!!!
The headboard is beautiful! It was well worth the time and effort! Thanks for sharing this!
Gorgeous bed!!!! Where is the bedspread from? I've been hunting for one like that.
Great job on the bed!!!
Awesome!
Great job on the bed!! it Rocks!!
KateSigh: I am pretty sure she got this at Target a while ago. Her husband works there so she knows when everything is on sale.
Andrea: THANKS. Thanks for a tripod, I wanted to get these as awesome as possible. Some of them had a 30 second exposure time! HEHE.
Beautiful work! :) Love this beyond description.
Any clue the cost of materials? I love this! Thanks for sharing.
This cost me about $130 to build. I bet I could sell this for $500. Not too bad eh!
Becky . . . I found this bed on Ana White. This is awesome. Why don't I live closer to you?
Beth Hunt
Looks great. Can you give us some more on how you mounted the shims? Were they doubled up or single layer? Thanks
There are a few more details on Ana White's site specifically on ideas for the shim part of the headboard. I added the link at the bottom of this post. Just click on her name.
THANKS all
Hi, I am about to embark on this adventure! I was looking at the shims and was wondering if you bought angled shims (if there is such a thing) or how you made them look that 3 denominational? I have read Ana's sight and have not found anything on that. Also any advice for me while I build? :)
Yes I am working on this bed right now and sanding the shims and then going to stain before I assemble. I also could not figure out how you made the shims look so great..did you start at the bottom or top of headboard? This turned out AWESOME and I want mine to turn out just like this!!
I love this look, but how do you actually construct the shims on the headboard?
Hey all:
About shims
I literally just bought about 13 packages of shims from Home Depot. Our has two sizes. Regular that you see everywhere are about 5 inches long I guess. They also have a longer size you could get but they are not thicker so I liked the smaller ones proportionately.
I nailed down my top header piece and started at the top. I laid out about 3 layers to see how they would fit together and to trim the edges that overlapped. Then I glued and nailed.
Mine is not perfect because shims are not perfect. My top 7 rows actually look really good but then they got a little uneven. You could of course buy lots of packages to sift through the ones to get the most even. I just kind of made it work. Just make sure the stain/paint gets down in the cracks which helps hide it a lot. THANKS ALL.
I was wondering on how to make this a platform bed. I saw somewhere you said to raise the frame 7 inches? Is that from the floor or from the 4 inches it's already at?
What type of wood did you use? We've priced out making this, but can't seem to make it for less than $300. My fiance says we need to use hardwood, however I only saw on Ana's page that hardwood was preferred for the piece of plywood.
Love this bed! Thank you!
What color stain did you use? It looks great! Its been added to my list
May I ask what brand of stain you used and which colour?
Thank You
Post a Comment